A7V – ASUS Mainboard: Review
Asus A7V
When AMD slowly shifted their processor packages from Slot A over to Socket A, a new crop of compatible motherboards started to emerge (A7V). The Socket A package followed the latest trend in processor designs, with the CPU core exposed on the top of the chip, thus allowing a heat sink plate to fit flush against the core. This design was essential for newer and faster generations of chips that generate a lot of heat, and this has proved to be the best way to get rid of it.
To complement this new design, a rash of new motherboards appeared on the market with the A7V offering from Asus appearing to be the most appealing. The Asus was one of the first Socket A motherboards to be released, and appears to have many advantages over its rivals.
The A7V was the first Socket A motherboard in Asus’ range, but if experiences with its previous motherboards are anything to go by, the A7V was a winner. There seem to be three revisions of this board in existence, one with Onboard Audio, one with Multiplier Dip-Switches and one with both of these features. The latter is very rare, but the one with Multiplier Dip-Switches is the most interesting, as it allows limitless overclocking potential when used with a willing CPU.
A7V Specs
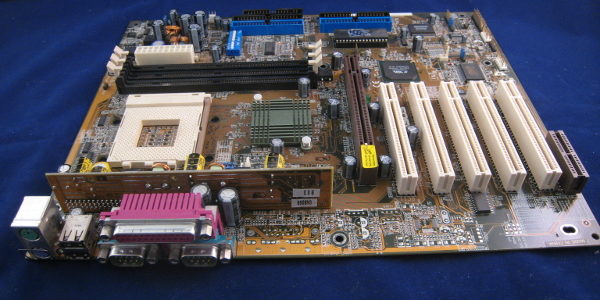
The Asus A7V is based on VIA’s latest high performance chipset, the KT133. It comprises the VT8363 North Bridge and the VT82C686A South Bridge chips. This chipset was designed especially for AMD’s latest Duron and Thunderbird Athlon processors. It has a vast array of special high-end features that complement the Socket A processor. Among these features is AGPx4 support enabling it to be used in high-end graphical work or intensive gaming with the latest Nvidia GeForce equipped graphics cards. Other features include support for PC133 and PC100 SDRam, as well as ATA66 support for IDE disk transfers at up to 66mb/s.
Also included in the chipset is support for NEC’s latest Ram technology, known as Virtual Channel SDRam (VCRam). This is a new type of memory based on the SDRam format which delivers up to 15% extra bandwidth at the same bus speed. The KT133 supports AC’97 compliant 3D audio that is implemented on some revisions of the A7V motherboard and MC’97 compliant Modem support for use with an AMR compliant modem.
The A7V adds on to the KT133’s feature set by adding support for 1.5GB of either PC133 or VC133 (Virtual Channel) Ram. Also included on the board is a Promise PDC20265 UltraDMA/100 controller that along with the UltraDMA/66 already provided by the KT133 chipset allows for up to 8 Simultaneous IDE devices. The UltraDMA/100 controller allows the connection of the latest breed of high end desktop HDD’s that have a peak transfer rate of 100mb/s which could prove to be a viable low cost alternative to a SCSI disk system.
An AGP Pro Slot is included to take advantage of the AGPx4 support included with the KT133 chipset. AGP Pro is normally found on workstation class graphics adapters, but the slot also support AGPx4 found on the latest high-end gaming graphics adaptors. Also on the board is support for up to 7 USB ports that is provided on a small hub that sits in a card bay.
The board has 5 PCI lots that are PCI spec 2.2 compliant, a single AMR slot for either Audio boards or a Modem riser, and as said above a AGP Pro slot. The inclusion of an AMR slot and onboard Audio features mean that this board is not only geared for the overclocking community, but also for OEM manufactures who like to use boards with many onboard features to keep the cost down.
The most interesting feature on the A7V is its various dipswitches that control Multiplier adjustment and front side bus adjustment. On automatic settings, the BIOS can control these settings and to a degree can be used for changing the FSB and voltage input, but greater accuracy is achieved by using dipswitches and jumpers.
Voltage selection is adjusted by using a series of four jumpers close to the CPU. The FSB and Multiplier adjustments are made using dipswitches by the UltraDMA/66 channels. The Multiplier cannot be changed when under the control of the BIOS.
The ability to overclock a chip this way is not documented in the Asus manual but is shown on the Asus website. This implies that the idea was a late one, and is further backed up by the fact that there are many revisions of this board, the original with Audio being without the necessary switches.
To overclock a Socket A processor, the multiplier bridges must be unlocked, and this can be done using the pencil trick, or, it is possible to purchase specially unlocked processors, which have been made multiplier free. Without an unlocked processor, only the FSB can be altered to gain extra speed. AMD are also selling some chips that are multiplier locked and some that are unlocked, so it is possible to purchase an unlocked processor from a non specialist overclocking establishment, but there is a chance that the processor you may buy might be a locked one.
The FSB can be increased in 1mhz increments in the 100 – 133mhz range. The KT133 chipset has the ability to provide dividers for the AGP and PCI busses even when the FSB is increased to 133 to keep the peripherals within acceptable speeds. With a processor which is unlocked and the ability to change the multiplier, increasing the FSB becomes a much less desirable, as the processor can be overclocked and still be kept inside its rated FSB. This way maximum system stability is achieved and a processor can be overclocked at the same time.
The voltage range on the A7V is between 1.10v and 1.85v, which is strange because the default voltage for the Duron and Thinderbirds are 1.65v, so anything lower won’t be used, therefore only a small range of voltage increases can be applied to the processor. A mod has been done where the voltage range has been shifted upwards to about 2.50v, which should prove more than adequate for all but the most extreme overclocker with liquid nitrogen cooling. Even with the processor running at 1.85v, a massive amount of heat is generated, as the Duron and Thunderbirds create a large amount of heat even at default voltages. Therefore a standard heat sink and fan combo will be insufficient for overclocking.
The larger board size means that all necessary connections are nicely laid out and in well thought of locations. On of the biggest advantage to extreme Overclockers is the presence of a riser board next to the positioning of the Socket A. It holds all of the necessary voltage regulating capacitors that create a stable voltage for the chip. Being on a riser board means that a large heat sink or other cooling devices can be fitted onto the board without fear of lack of space. Asus has recognised the needs of the most extreme Overclockers by including drilled holes on the PCB where heavy duty cooling equipment can be physically bolted onto the board in safe locations. There are four drilled holes, one in each corner of the Socket A.
The Northbridge chip has a heat sink on for passive cooling, presumably to make the board more stable. Reference pictures on the box indicate that there were no heat sinks present originally; they must have been added after concerns were raised possibly after stability testing proved the chipset to generate a lot of heat.
The BIOS on board the A7V supports PnP and ACPI like all other new BIOS chip revisions do these days, but includes Symbios® SCSI BIOS as the BIOS treats the UltraDMA/100 controller as a SCSI device to enable booting from a drive connected to these channels.
Other useful inclusions are Wake-On-LAN and Wake-On-Ring which are useful in an office environment but not so much for the PC enthusiast. It also supports Chassis Intrusion via a special switch, which is sold separately.
My A7V from Overclockers UK (www.overclockers.co.uk) arrived in a very large yellow box. The first thing you realise is the sheer size of this beast; it’s a full ATX board so it won’t fit into any small cases. The next thing I checked was to see if it was the Dipswitch version, which it was, so a lot of overclocking was in order.
The CPU of my choice was the AMD Duron 650mhz Processor, which is in a Socket A package. I had read a lot of reviews before parting with my hard earned cash, and the 650 seemed to offer the best overclocking potential.
Both these together resulted in a very promising combo that could prove to be excellent value for money. The chosen Heat sink/Fan combination was the Alpha PEP66u unit, world renowned for its superior heat dissipation properties. Unfortunately this heat sink is not approved by AMD, as it has been know to crush the cores of several chips, as the core material is very fragile, thus resulting in an unusable chip. Great care was used to attach the heat sink unit onto the motherboard, which I did outside the case for safety. I used a small drop of heat transfer compound to aid the heat sink in its duties.
Being a Full ATX motherboard meant that there were many mounting points on the board, all of which seemed to be in the incorrect places for my full tower case. A little bit of case modding later resulted in correct placing of riser supports to mount the motherboard on.
With the board in place and Heat sink / fan combo attached, I realised that I had forgotten to install the CPU temperature probe. So out came the motherboard and off came the Heat sink / fan (which on the PEP66u is a very long process as a cage is fitted over Heat sink to mount the fan) and I placed the temp probe on the processor very near to the core. Back on went the Heat sink / fan and I installed the motherboard back into the case. I connected up the connectors for HDD, Power LED, Reset, Power Switch and speaker, making sure to get the orientation right.
I installed my Video Card and Sound Card, and connected my various drives up to the UltraDMA/66 channels to start with, and then made sure that all was connected properly. Turned it on at auto detect settings for the processor and the BIOS correctly identified my Duron a 650mhz version, and I proceeded to start the BIOS setup.
Test Setup System:-
- Asus A7V Rev 1.01 Bios Rev 1004a
- AMD Duron 650mhz Specially Unlocked
- 192mb PC 100 SDRam
- 30.7gb IBM GXP75 UltraDMA/100
- Leadtek Winfast GeForce 2MX 32mb
The A7V is a very competent motherboard, with a host of impressive features. It proved to be very stable in testing and also in day-to-day usage. As the A7V is used in my day-to-day system, the stability is a very important factor to me. Being able to run at 927Mhz for hours on end is what this board has allowed me to do, and combined with one of the easiest upgradeable boards in terms of being able to buy an AGP Pro Graphics adapter and extra UltraDMA/100 drives in the future ensures that this board will continue to reside in my computer for a long time.
Buying a motherboard made by a manufacturer like Asus is also a plus as new BIOS updates will always be available, unlike many smaller PC component companies, and its wide use in the overclocking community ensures support is available from all levels.
The A7V is definitely the motherboard to get if you have an Unlocked Duron or Thunderbird Athlon processors as it will allow you to get maximum performance from your hardware. Even without an Unlocked processor, the A7V still continues to shine with its extra features that make it suitable for a high-end system.
Pros:
- The excellent overclocking potential
- The stability it gave during benchmarking and still does
- AGP Pro slot and UltraDMA/100 channels
- Ability to connect up to 8 IDE devices
Cons:
- Relitavley high price compared to other Socket A motherboards
- Multiplier Adjustment not possible through BIOS
- Large Size might be a problem for smaller cases.
Overall:
- 5 out of 5
